- Paper flowers are versatile and long-lasting: They provide a cost-effective, customizable, and eco-friendly alternative to real flowers for décor, gifts, and events.
- Essential supplies make crafting easier: Colored paper, scissors, glue, and optional templates or markers help create polished, professional-looking flowers.
- Different flowers require different techniques: Carnations, tulips, roses, daisies, lilies, and sunflowers each have unique folding, cutting, and shaping methods to achieve realistic results.
- Advanced techniques elevate realism: Methods like quilling, layering, shaping, and color blending add depth, dimension, and lifelike details to paper blooms.
- Arrangement matters: Mixing flower types, sizes, and colors, adding greenery, and using creative containers transforms individual flowers into stunning displays.
- Paper flowers are perfect for events: Weddings, birthdays, holidays, and DIY gifts can all benefit from custom paper flower décor, which is durable and easy to transport.
- Experimentation encourages creativity: Using glitter, metallic paper, origami folds, mixed textures, miniature or oversized flowers, and embellishments allows for unique, personalized creations.
Paper flowers are a fantastic way to bring beauty into your home, create memorable gifts, or add charm to special events without spending a fortune. Whether you’re a beginner or a seasoned crafter, learning how to make paper flowers can be both fun and rewarding. In this guide, we’ll explore step-by-step techniques for making a variety of paper flower types, including carnations, tulips, roses, daisies, and more.
Why Make Paper Flowers Instead of Using Real Ones?
You might wonder why anyone would spend time crafting paper flowers when real flowers are readily available. Here are some key reasons:
- Longevity: Unlike fresh flowers, paper flowers last indefinitely.
- Customization: You can choose colors, sizes, and styles that perfectly match your décor or event.
- Cost-effective: Once you have the supplies, creating dozens of flowers costs a fraction of what real flowers would.
- Eco-friendly: You can reuse scrap paper or recycled materials, reducing waste.
Paper flowers are versatile, and mastering a few techniques allows you to make arrangements for home décor, weddings, birthdays, and holidays.
What Supplies Do You Need to Make Paper Flowers?
Before diving into specific flower types, it’s essential to have the right materials. Here’s a list of common supplies:
- Colored craft paper, tissue paper, or crepe paper
- Scissors (sharp ones for precision cutting)
- Craft glue or hot glue gun
- Floral wire or pipe cleaners for stems
- Ruler and pencil
- Templates for petals and leaves (optional but helpful)
- Markers, paint, or pastels for adding details
Having these materials on hand makes the process smoother and ensures your flowers look polished and professional.
How to Make Paper Carnations
Carnations are classic, frilly flowers that look impressive when layered. Here’s a simple way to create them:
Materials Needed:
- Crepe paper (pink, red, or your preferred color)
- Floral wire
- Scissors
- Glue
Steps:
- Cut a rectangle of crepe paper (approximately 5 x 7 inches).
- Accordion-fold the paper lengthwise.
- Snip the edges into a rounded or zigzag pattern.
- Wrap the folded paper around one end of the floral wire.
- Secure with glue and gently fluff the layers to create a full bloom.
Tips:
- Use multiple layers for a fuller carnation.
- Stretch the crepe paper slightly to add natural curves.
Carnations are perfect for bouquets, centerpieces, or even wall decorations.
How to Make Paper Tulips
Tulips are simple yet elegant. They work well for beginners and advanced crafters alike.
Materials Needed:
- Colored paper
- Floral wire or green pipe cleaners
- Scissors
- Glue
Steps:
- Cut an oval or teardrop shape from colored paper for the petal.
- Fold the base slightly and glue to form a cone shape.
- Repeat with 3-5 petals and glue them together around the floral wire.
- Create leaves from green paper and attach to the stem.
Tips:
- Slightly curl the edges of petals for a more realistic look.
- Combine tulips in a small vase for a cheerful display.
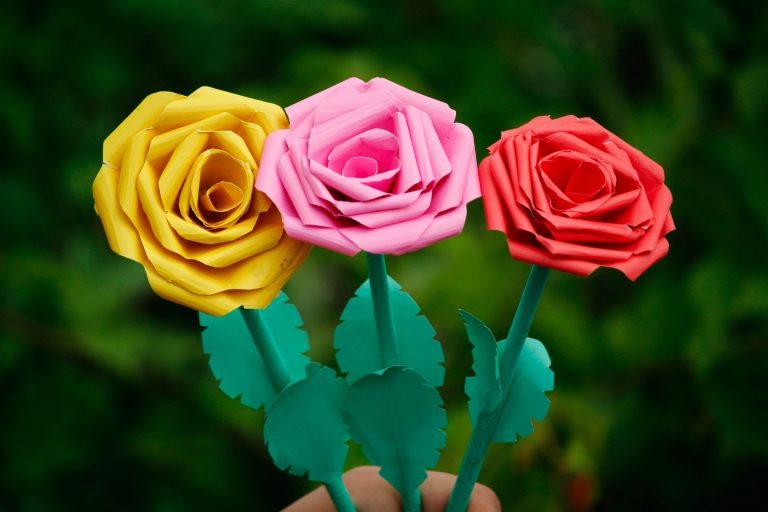
How to Make Paper Roses
Roses are the most iconic paper flower and can be as simple or as intricate as you like.
Materials Needed:
- Red, pink, or white craft paper
- Floral wire
- Glue
- Scissors
Steps:
- Cut a spiral shape from your paper. The outer edge should be wavy to resemble petals.
- Start rolling the spiral from the outside inwards.
- Secure the base with glue and attach it to a floral wire.
- Adjust the petals to open or tighten the bloom as desired.
Tips:
- Using thicker paper creates a more structured rose.
- Practice on smaller spirals first to get the hang of rolling evenly.
How to Make Paper Daisies
Daisies are cheerful flowers that are easy to make and great for beginners.
Materials Needed:
- White or colored paper
- Yellow paper for the center
- Floral wire or pipe cleaners
- Glue
- Scissors
Steps:
- Cut petal shapes from white paper (long and narrow with rounded tips).
- Glue petals in a circular pattern onto a small yellow circle.
- Attach the flower to a stem using floral wire.
- Optional: slightly curl the petals for dimension.
Tips:
- Use small and large petals together to add depth.
- Combine daisies with roses and carnations for mixed bouquets.
How to Make Paper Lilies
Lilies are elegant and sophisticated, perfect for weddings or fancy arrangements.
Materials Needed:
- Colored paper
- Floral wire
- Glue
- Scissors
- Pencil for curling petals
Steps:
- Cut six long, pointed petal shapes.
- Curl the edges slightly with a pencil.
- Glue three petals together in a triangle, then attach the other three.
- Add a stamen in the center using a small rolled piece of paper.
- Attach to a floral wire stem.
Tips:
- Use pastel colors for a soft, realistic look.
- Lilies pair beautifully with greenery in arrangements.
Can You Make Paper Sunflowers?
Absolutely. Sunflowers are bold and cheerful, and surprisingly easy to craft.
Materials Needed:
- Yellow paper for petals
- Brown paper for the center
- Green paper for stems
- Glue and scissors
Steps:
- Cut long petal shapes from yellow paper.
- Layer petals around a brown circular center.
- Add texture to the center by gluing small paper strips or curling tiny pieces.
- Roll a strip of green paper tightly to form a stem and attach it to the back of the flower using glue.
Tips:
- Sunflowers look best with larger petals.
- Combine multiple sunflowers for a dramatic display.
What Are Some Advanced Paper Flower Techniques?
Once you’ve mastered the basics of paper flowers, experimenting with advanced techniques can take your creations to the next level. These methods add realism, depth, and unique flair, making your flowers almost indistinguishable from real blooms.
Quilling:
- Quilling involves rolling thin strips of paper into tight coils and shaping them into petals, spirals, or flower centers.
- You can pinch the coils into teardrop or marquise shapes to create delicate petals.
- Quilling is excellent for small flowers, intricate designs, or adding decorative accents to larger blooms.
Layering:
- Layering means stacking multiple petals in different sizes, shapes, and shades of color.
- Start with larger petals on the bottom and gradually add smaller ones toward the center.
- This technique gives flowers volume and dimension, creating a lifelike, full-bodied bloom.
Shaping:
- Shaping paper petals can mimic the natural curves and folds of real flowers.
- Techniques include stretching the paper gently, folding edges, or curling petals around a pencil or dowel.
- Shaping works particularly well for roses, lilies, and peonies, adding a soft, organic feel.
Color Blending:
- Adding subtle variations in color can make a flower look more realistic.
- Use watercolor paints, soft pastels, or colored markers to shade edges, highlight veins, or darken centers.
- Blend colors gradually for natural transitions, and experiment with two-toned petals for extra depth.
Additional Tips:
- Combine techniques for the best effect—for example, layer petals and then shape them for a realistic rose.
- Keep experimenting with textures, paper thicknesses, and color blending to find your signature style.
How Do You Arrange Paper Flowers?
Creating individual flowers is satisfying, but arranging them is where your creativity really shines. Proper arrangement transforms simple paper blooms into stunning displays.
Tips for Stunning Arrangements:
- Mix flower types and sizes: Combine large focal flowers with smaller accent flowers for visual interest and balance.
- Add greenery or paper leaves: Even simple green paper leaves can make arrangements look more natural and complete.
- Consider height and depth: Place taller flowers toward the center or back and smaller ones in front for a layered effect.
- Play with color combinations: Use complementary or analogous colors to match the mood of your room or event.
- Choose unique containers: Mason jars, vintage vases, teacups, or handmade paper pots add personality and charm.
- Think about movement: Allow some stems to bend slightly or droop naturally for a more relaxed, organic feel.
Arrangements can be as casual or as formal as you like—paper flowers are versatile enough to suit any style.
How to Make Paper Flowers for Events
Paper flowers are perfect for events because they are lightweight, long-lasting, and customizable. You can create anything from small accents to large statement pieces.
Ideas for Event Use:
- Weddings:
- Make bridal bouquets, bridesmaids’ bouquets, and boutonnieres.
- Create table centerpieces, ceremony arches, or hanging floral installations.
- Customize colors to match the wedding theme, and mix real and paper flowers for a unique touch.
- Birthdays:
- Craft colorful garlands, wall backdrops, or cake toppers.
- Make party favors with small paper flower arrangements.
- Coordinate colors with party themes for a cohesive look.
- Holidays:
- Design themed flowers for Christmas, Easter, Valentine’s Day, or Halloween.
- Add glitter, metallic paper, or patterned paper for a festive flair.
- Use paper flowers as table décor, wreath accents, or gift toppers.
- DIY Gifts:
- Attach paper flowers to handmade cards or gift boxes.
- Create small bouquets as personalized gifts for friends, teachers, or coworkers.
- Combine with other paper crafts for layered, creative presents.
Paper flowers are also easy to transport, lightweight, and durable, making them ideal for parties, school events, or large-scale celebrations. With a little planning, you can create unforgettable décor that lasts far beyond the event.
Common Mistakes to Avoid When Making Paper Flowers
Even experienced crafters sometimes run into issues. Here are some common pitfalls:
- Using paper that is too thin or flimsy, causing petals to tear.
- Skipping layering or fluffing, which makes flowers look flat.
- Using too much glue, which can leave sticky residue.
- Not curling petals, resulting in flowers that look stiff or unnatural.
- Overcomplicating beginner flowers—start simple before advancing.
How Do You Store Paper Flowers?
Proper storage ensures your creations last for years:
- Keep flowers in boxes or containers to avoid crushing.
- Avoid direct sunlight to prevent fading.
- Store in a dry area to prevent moisture damage.
- For delicate flowers, wrap them in tissue paper.
With proper care, paper flowers can be reused for multiple events or home decorations.
What Are Some Fun Variations to Try?
Once you’ve mastered basic paper flower techniques, adding creative variations can make your projects even more exciting. Experimenting with different materials, sizes, and styles lets you push the limits of your creativity and make truly unique designs.
Glitter or Metallic Paper for Festive Looks:
- Using glitter or metallic paper instantly adds sparkle and glamour to your flowers.
- Ideal for holiday décor, party centerpieces, or celebratory events.
- Tip: Apply glue sparingly and sprinkle glitter lightly to avoid clumping, or use metallic cardstock for a sleek, reflective finish.
Origami-Style Folding for Geometric Flowers:
- Origami techniques can turn simple squares of paper into intricate, geometric blooms.
- Perfect for modern décor or minimalistic arrangements.
- Try folding modular pieces together to create a single flower with a striking, sculptural look.
Mixing Paper Types for Texture:
- Combine tissue paper, crepe paper, and cardstock for petals to create depth and variety.
- Tissue paper adds softness, crepe paper gives natural curves, and cardstock provides structure.
- Experimenting with textures gives your flowers a more realistic and dynamic appearance.
Making Miniature Flowers for Jewelry, Cards, or Scrapbooks:
- Tiny paper flowers can be used as embellishments for handmade cards, scrapbooks, or even jewelry like earrings and brooches.
- Use thin strips of paper and small tools like tweezers for precision.
- Miniature flowers are perfect for gifts or personalized projects where a delicate touch is needed.
Creating Oversized Flowers for Wall Décor or Photo Backdrops:
- Large-scale flowers make bold statements for parties, weddings, or home décor.
- Use larger sheets of paper and reinforce stems or petals with extra layers or rolled paper for stability.
- Oversized flowers can be arranged on walls, arches, or as part of a dramatic table centerpiece.
Experiment with Color and Patterns:
- Try combining patterned paper with solid colors for a whimsical or artistic effect.
- Ombre or gradient petals can add sophistication and realism.
- Don’t be afraid to mix unexpected colors—paper flowers allow you to break the rules of nature.
Use Accessories and Embellishments:
- Add beads, sequins, or ribbon to the center of flowers for extra detail.
- Layer multiple materials to create multidimensional blooms that stand out.
The possibilities are endless, and experimentation is a huge part of the joy of paper crafting. By trying different sizes, textures, and techniques, you can create a collection of paper flowers that are uniquely yours and suited for any purpose—from décor to gifts, events, or personal projects.
Final Thoughts
Making paper flowers is a satisfying hobby that allows creativity, personalization, and endless possibilities. From carnations to tulips, roses, daisies, lilies, and sunflowers, mastering a few techniques lets you create beautiful, long-lasting blooms for any purpose.
Whether you’re decorating your home, planning an event, or crafting gifts, paper flowers are a fun, cost-effective, and eco-friendly alternative to fresh flowers. Start simple, practice layering and shaping, and soon you’ll have an impressive collection of handmade blooms that are uniquely yours.